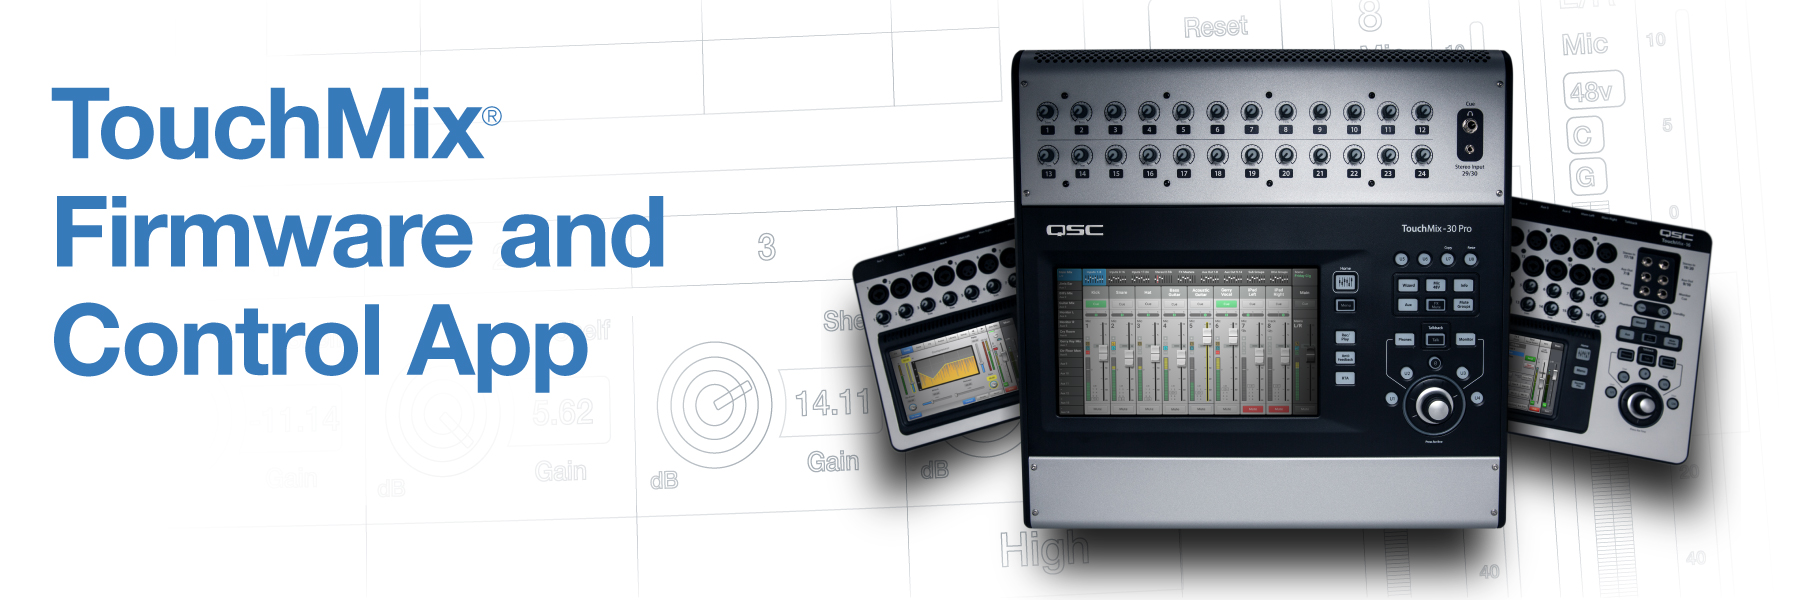
New iOS Control Apps for all TouchMix Mixers
Announcing new iOS TouchMix Control Apps for iPhone and iPad devices for all TouchMix mixers providing full compatibility with the latest iOS17.4 update.
With TouchMix-30 Pro firmware version 3.0, Scenes, Snapshots and Cue Lists can be used to store and recall mixer settings. Scenes provide the ability to store and recall the entire mixer configuration, while Snapshots allow to save and recall selected settings for designated channels without affecting other mixer settings. Cue Lists select and arrange Scenes, Snapshots and audio files into a predetermined sequence for recall during a show, while offline editing provides the ability to create and edit mixer configurations without the mixer being connected to Wi-Fi.
Attention Android Users:
Please verify that the new TouchMix-30 Pro Android App will download/install on your tablet before downloading the mixer v3.0 Firmware.
Due to the nature of Android device design, some older and/or less powerful devices are incompatible with firmware v3.0. It is also possible that some newer devices may deliver a less than optimum user experience. In this case, firmware v2.0 remains available for restoration of your TouchMix mixer to its previously known, stable state.
Control App
- TouchMix-30 Pro Android App
- TouchMix-30 Pro iOS App (New)
- iOS App Update Procedure
- TouchMix-30 Pro iOS App Release Notes
Firmware
Please read the Release Notes and the Windows or macOS® installation instructions below prior to downloading firmware
- Download Version 3.0.12462 06/08/2023
- Release Notes
- Firmware Installation Instructions (Windows)
- Firmware Installation Instructions (macOS)
- Direct Download and Installation
- Problems with updating?
Windows DAW USB Driver
Release Notes for TouchMix-30 Pro Control App Version 3.0.34
This update to the TouchMix-30 Pro Control App deals with a number of problems caused by changes in iPadOS 17.3 and 17.4 as well as incorporating other improvements and minor bug fixes.
- Fixed improper display of dialog boxes.
- Improved reconnection to mixer after briefly switching away from TouchMix-30 Pro app.
- Improved iPad Cue List operation.
- Fixed an issue that caused the iPad app to crash when connecting to a mixer while recording.
- Fixed Home Screen Copy and Paste bug.
- Made changes to prevent entry of non-alphanumeric characters in user-entered filenames.
- The user will now be informed if they have chosen an illegal prefix (such as CON) for their device name.
- Fixed a bug that could cause the wrong popup to display under certain conditions when creating a new session with a name that conflicts with an existing session.
- Improved Custom Fader Bank setup screen so that the Empty Space (when inserted) is displayed correctly without refreshing the screen.
- Fixed a bug that caused a “Session already exists” message to be displayed when attempting to create a new session from an iOS device.
- Fixed problem that displayed an incorrect popup on Aux output Aux Sends screen.
- Fixed an issue that caused nudge buttons to be unresponsive when adjusting main mix from iOS app.
- Fixed an issue that resulted in improper functioning of security login from app.
- Fixed an issue that caused loss of iOS app control over personal monitor mix under certain conditions.
- Various small bug fixes.
iOS App Update Procedure
This is a guide to assist in the transition from:
TouchMix-8/-16 iOS App 3.0.25 to 3.0.26, and
TouchMix-30 Pro iOS App 3.0.19 to 3.0.22.
Requirements:
Recommended TouchMix-8/-16 Firmware: 3.0.0955
Recommended TouchMix-30 Pro Firmware: 3.0.12462
Recommended iPad Device Software: iOS 17.1 to iOS 17.3.1 (see FAQ)
Preparation
- Please make sure that your iPad or iPhone is updated to iOS 17.1 or later for optimal operation.
- Prepare your wireless control network (QSC dongle, or external router) for connection with the TouchMix.
Procedure
- On your TouchMix, navigate to the Device List in the Remote Control menu via the following button presses: Menu > Remote Control.
- If you have previously connected your iPad or iPhone to the TouchMix, you will need to delete these devices from the device list. You can do this by selecting your device in the list, pressing the ‘Remove Device’ button, and pressing ‘Yes’ to confirm the action.
- On your iPad or iPhone, delete the old version of the TouchMix Control App. You can do this by finding the app on your device screen, pressing and holding the app icon for 2 seconds, pressing ‘Remove App’, pressing ‘Delete App’, and again pressing ‘Delete’.
Important Note: If you press and hold the app icon for longer than 2 seconds, the app icons will begin to shake. In this case, you will want to press the ‘minus’ button next to the Touchmix Control App icon, press ‘Delete App’, and again press ‘Delete’. - Navigate to the App Store and download the latest version of the Touchmix Control App.
- Open the Touchmix Control App on your iPad or iPhone. On the first pop-up, Select ‘Allow’ to allow local network communication. On the second pop-up, enter a name for the device, and press ‘Ok’, twice.
Important Note: Certain file names are reserved, so please do not utilize device names starting with AUX, CON, COM, LPT, NUL, or PRN. Additionally, avoid the use of any special characters. - Navigate to iOS Settings and connect to the Wi-Fi network that controls your Touchmix.
Important Note: Make sure that if you use the ‘Auto-Join’ setting for wireless networks, your TouchMix control network is the only Wi-Fi network set to ‘Auto-Join’. - Navigate back to the Touchmix Control App. If there is a pop-up that states, “You are connected”, press ‘Ok’. If there is no pop-up, please exit the Touchmix Control App, check your wireless network connection, and re-open the Touchmix Control App.
- On your Touchmix, Navigate to the Device List in the Remote Control menu via the following button presses: Menu > Remote Control.
- Select your device name from the list on the left, grant appropriate access control via the sliders on the right, and press the green ‘Save’ button at the bottom of the screen.
- Navigate to the home screen on your Touchmix and verify that when faders are moved on the iPad or iPhone, they also move on the Touchmix.
Important note: If the faders do not move, make sure that you have selected the correct fader bank on your iPad or iPhone. For example, if you only granted access control to Aux 1, you would need to navigate to Aux 1 on your control device and on the TouchMix interface to see the appropriate faders move.
FAQs
How do I know if my iPad or iPhone is compatible with iOS17?
Here is a list of compatible iPhones: https://support.apple.com/guide/iphone/models-compatible-with-ios-17-iphe3fa5df43/ios
Here is a list of compatible iPads: https://support.apple.com/guide/ipad/models-compatible-with-ipados-17-ipad213a25b2/ipados
My iOS device will not update to iOS17, can I still use this device with the new app?
Yes. You can use older devices with the newest Touchmix App. However, these Apps were built for best compatibility with iOS17 (up to iOS 17.3.1). With this in mind, if you are utilizing older devices and older operating systems, the quality of your user-experience may vary.
My TouchMix-30 Pro shows ‘Unknown Device’ in the Device List under Remote Control Settings, how do I fix this?
This is often an indication that you connected to the TouchMix Control Network before naming your device in the app. Complete the procedure above; then select ‘Unknown Device’ on the device list, press ‘Remove Device’, and press ‘Yes’.
There is a pop-up that says, “The file operation could not be completed. Please ensure the external drive is a writable FAT32 drive with sufficient space." How do I fix this?
This is often an indication that you did not remove the previous device name before establishing a new device name. Power cycle the Touchmix. Delete and reinstall the app, then assign a different device name. On the Touchmix, assign permissions to the new device name from the Remote Control Settings menu, and then remove the previous device names from the device list.
I upgraded to iOS 17. Why does my iOS device disconnect from the mixer when navigating away from the Control App?
This intermittent issue was resolved in a previous app build, but has now returned due to unforeseen software changes initiated by the iOS 17.2 release. QSC is actively working to correct this issue.

MacOS
TouchMix-30 Pro supports macOS® DAW natively via Core Audio. No additional driver required.
Release Notes for TouchMix-30 Pro Firmware Version 3.0.12462
New Features / Improvements
- Improved patch matrix editing.
Bug Fixes
- Fixed a bug that caused Omit from Scene Recall to function improperly.
- Resolved an issue that could cause the screen and controls to freeze during intensive use. Note that this improvement required limiting the size of various lists including user scenes, user presets, snapshots and cue lists to sixty items per list.
- Fixed a minor display problem on the Monitor control popup.
- Fixed issues related to channel safe.
- Fixed sticky clip indicators on auxiliary outputs.
Known Issues
- The internal Info screens for ‘Menu’ and ‘Scenes, Snapshots, and Cue Lists’ are not provided in any languages other than English.
Release Notes for TouchMix-30 Pro Firmware Version 3.0.12379
New Features / Improvements
This release includes major additions to the ability to save, recall and manage settings.
- Snapshots save and recall selected settings for designated channels without affecting other mixer settings.
- Update provides a shortcut to saving current settings to a scene, snapshot or user preset.
- Adds Cue Lists. This feature may be used to select and arrange scenes, snapshots and audio files for recall or playback.
- Backup creates and stores an archive that includes all mixer settings, scenes, snapshots, cue lists and user presets.
- Save to App supports storage/recall of scenes, snapshots, cue lists and backups to/from a tablet.
- Snapshots, scenes and user presets now include an Info field where a description may be entered.
- Adds Snapshot and Cue List assignment options to User Buttons.
- Improved loading speed for scenes.
Custom Fader Banks now include the option of inserting empty channels when the user wishes to include fewer than eight channels in a bank.
Offline creation and editing of scenes, snapshots and cue lists.
Bug Fixes
- Fixed a bug that caused the next/previous function to work improperly when using Custom Fader Banks.
- Fixed a bug that caused the faders to be displayed improperly on some iPad models (available from the App Store).
Known Issues
- The internal Info screens for ‘Menu’ and ‘Scenes, Snapshots, and Cue Lists’ are not provided in any languages other than English.
Release Notes for TouchMix-30 Pro Firmware Version 2.0.11665
New Features / Improvements
This is a maintenance release and does not add any new features or functionality. See below for a list of the bugs we’ve squashed. Before you install the firmware, remember the first rule of shows…
If you are about to do a show with your gear set up and working don’t be changing things. Give yourself time to do the upgrade and get all the mixer’s settings squared away.
Bug Fixes (Mixer)
- Fixed a bug that could cause the mixer to crash when a very large number of screens have been loaded.
- Repaired an issue that could cause the compressor to operate improperly when certain channels are selected as a Side Chain source.
- Addressed a bug that could cause Stereo In 27/28 to display the audio level of Stereo In 29/30 when Stereo In 29/30 is selected as a Side Chain source.
- Rectified a bug that caused all input channels to be assigned to the Main L/R mix when a Channel Reset was performed on the Main L/R even if the input channels had been unassigned.
- Corrected a problem that caused the Compressor on Ch. 20 to become inoperative.
- Remedied an issue that could cause Inputs 19 and 20 to send distortion/noise at a high level with a certain combination of settings.
Bug Fixes (iPadOS)
- Fixed a problem that could prevent display of the channel name label and gain indication.
Release Notes for TouchMix-30 Firmware Version 2.0.11265
New Features / Improvements
Bug Fixes
- Fixed a bug that could cause the master rotary encoder and other controls to become sluggish or unresponsive.
- Fixed a bug that can cause Aux mix names and linking to be reset to factory default settings.
- Minor corrections to text and labelling.
Release Notes for TouchMix-30 Firmware Version 2.0.11095
New Features / Improvements
In response to user requests, the 2.0 release adds significant new capabilities to the TouchMix-30 Pro.
- Support for external control by third-party, motorized-fader control surfaces directly connected to the mixer via MIDI-over-USB.
- Support for external control by third-party, motorized-fader control surfaces directly connected to an iOS tablet via MIDI-over-USB.
- Adds a new External Faders mode (Menu > External Faders) that displays a channel strip view on screen when used with an external control surface.
- Adds three Custom Fader Banks (Menu > Custom Banks) that may be easily configured to include any combination of input, output, FX return, sub-group and DCA group faders.
- Improved Solo In Place (SIP) operation. FX returns are no longer affected by SIP.
- Additional input channel presets for percussion (cajon, djembe, timbale, percussion toys), electronic drum kit, harmonica, flute, cello, accordion and various Banda instruments. Adjustments were also made to vocal and bass presets.
- Added support for CP Series Compact Powered Loudspeakers.
Bug Fixes
- Fixed a bug that caused only the left channel of a linked pair to be shown in the Auto-Mixer view.
- Fixed a bug that caused channels 19 and 20 to output noise under a specific combination of conditions.
Known Issues
- Internal info system has not been updated to reflect the features and improvements described above.
- Connection of external control surfaces to Android devices is not supported and there is currently no plan to do so.
- Android Only - The Phones button may show as being engaged when it is not.
- When multiple tablets are used to control a mixer and Simple Mode is enabled on one of the tablets, it may cause an erratic display of the same function on the other tablets.
- After a 3rd party control surface is connected, the mixer may need to be power-cycled before the control surface is recognized.
- The mixer does not reconnect to a network after a firmware update. This is normal operation. A notification that a power cycle is required is displayed on the mixer following the update.
- Before updating your mixer be sure to allow yourself ample time before your next use of the mixer.
- Problems with updating? Go to the TouchMix-30 Pro Updater Recovery Instructions page for help.
- Start firmware Download.
- Before updating your mixer be sure to allow yourself ample time before your next use of the mixer.
- Problems with updating? Go to the TouchMix-30 Pro Updater Recovery Instructions page for help.
- Start firmware Download.
- Before updating your mixer be sure to allow yourself ample time before your next use of the mixer.
- Problems with updating? Go to the TouchMix-30 Pro Updater Recovery Instructions page for help.
- Start firmware Download.
Windows Download and Installation
Revised 06/07/2017
The following instructions apply to a download that is performed using a Windows computer.
- Download the latest firmware from the QSC website. By default, the file will be saved to Downloads on your computer.
- Drag the downloaded file onto your desktop.
- Unzip the downloaded file by double clicking it. The extracted contents will be a new .install file which will appear on the desktop.
- Prepare a USB thumb-drive, SSD or HD with 1GB of available storage space formatted FAT32. For best results, use a freshly formatted drive. The easiest way to perform the format is by using the TouchMix-30 format utility which may be found in the Recording Setup (Record/Play > Recording Setup).
- Copy the .install file onto the USB storage device. The file on the storage device will be in the format "V1.2.0000.install". The version number will vary depending on the release but the file will always end with extension ".install".
- Safely eject the USB storage device from your computer.
- Insert the USB storage device into one of the two USB ports on the mixer's rear panel. Note that the mixer will only recognize one USB storage device at a time.
- Press the Menu button, then touch the Mixer Setup button.
- On the Mixer Setup screen, touch the Upgrade button. A dialog box displays with some IMPORTANT information about saving the mixer's current settings.
- Touch the Proceed button to continue the upgrade. The mixer will boot into the Software Upgrader program. This takes a few minutes.
- Select the upgrade file you want to use. If you downloaded to a freshly formatted drive, there will be only one upgrade file displayed.
- Touch the Upgrade button to begin the upgrade process. This can take up to 10 minutes and must not be interrupted.
- When the upgrade is complete, a dialog displays indicating the upgrade was successful. Press the OK button to exit the Software Upgrader and reboot the mixer.
- If you experience problems connecting to tablets and smartphones, put the mixer into Standby disconnect AC power for a few seconds and then reconnect.
* In the event that the update fails, a Recovery Utility is available for download.
macOS Download and Installation
Revised 11/17/2022
Before you download!
The TouchMix updater expects to see a zipped .install folder. Macintosh computers include features that automatically unzip downloaded folders and they seem quite insistent about doing so.
Before downloading the file, follow these steps:
- Launch the finder on your Mac and Type "Archive Utility" in the search field.
- To locate the Archive Utility manually – double-click the icon for the drive containing your computer's system, follow the path: System/Library/CoreServices/Applications.
- If you do not have access to your Macintosh HD, click anywhere on your desktop, click the word "Finder" in the upper left hand corner of your desktop and select preferences. In the general tab, under 'Show these items on the desktop:" check the box next to "Hard Disks" and your Macintosh HD will appear on the desktop. You can then follow the path above to access the Archive Utility.
- Double click the Archive Utility icon to launch the application.
- On the Menu Bar at the top of the screen, click on "Archive Utility" and select "preferences" from the drop down menu.
- On the Archive Utility Preferences window, uncheck "Keep expanding if possible".
- If using Safari- Double click the "Safari" icon to launch the browser.
- On the menu bar at the top of the screen, click on "Safari" and select "Preferences" from the dropdown menu.
- On the Safari Preferences window, uncheck "Open safe files after downloading".
Your macOS computer will now download the upgrade without unzipping it.
- Download the latest firmware from the QSC website. By default, the file will be saved to Downloads on your computer.
- Drag the downloaded file onto your desktop
- Unzip the downloaded file by double clicking it. The extracted contents will be a new .install file, which will appear on the desktop.
- Prepare a USB thumb-drive, SSD or HD with 1GB of available storage space formatted FAT32. For best results, use a freshly formatted drive. The easiest way to perform the format is by using the TouchMix-30 Pro format utility which may be found in the Recording Setup (Record/Play > Recording Setup).
- Copy the .install file onto the USB storage device. The file on the storage device will be in the format "V2.0.0000.install". The version number will vary depending on the release but the file will always end with extension ".install".
- Safely eject the USB storage device from your computer.
- Insert the USB storage device into one of the two USB ports on the mixer's rear panel. Note that the mixer will only recognize one USB storage device at a time.
- Press the Menu button, and then touch the Mixer Setup button.
- On the Mixer Setup screen, touch the Upgrade button. A dialog box displays with some IMPORTANT information about saving the mixer's current settings.
- Touch the Proceed button to continue the upgrade. The mixer will boot into the Software Upgrader program. This takes a few minutes.
- Select the upgrade file you want to use. If you downloaded to a freshly formatted drive, there will be only one upgrade file displayed.
- Touch the Upgrade button to begin the upgrade process. This can take up to 10 minutes and must not be interrupted.
- When the upgrade is complete, a dialog displays indicating the upgrade was successful. Press the OK button to exit the Software Upgrader and reboot the mixer.
- If you experience problems connecting to tablets and smartphones, put the mixer into Standby disconnect AC power for a few seconds and then reconnect.
Direct Download and Installation
Revised 06/07/2017
When connected to the internet, TouchMix-30 Pro mixers with software version 1.1 or higher can check for and download subsequent software updates. If an update is available, a message will appear with some information about it. You may dismiss the message or proceed with the update.
- You will need:
- A reliable internet connection.
- A connection between the mixer and the internet router.
- A USB thumb-drive, SSD or HD with 1GB of available storage space formatted FAT32. For best results, use a freshly formatted drive.
- Insert the formatted USB drive into one of the mixer's USB ports.
- Initiate the download (Menu > Mixer Setup > Download Upgrade).
- A message will appear "Contacting the Server".
- If the mixer already has the latest version installed or if the server is not available a message will appear "The latest version is installed".
- Touch the confirmation prompts and the mixer will download the update to the USB drive.
- Upon completion, a "Download Successful" message will be displayed.
- If this message is not displayed, the complete update has not been downloaded. Check your internet connections and try again or use your computer to download the update from www.qsc.com.
- Press the Menu button, then touch the Mixer Setup button.
- On the Mixer Setup screen, touch the Upgrade button. A dialog box displays IMPORTANT information about saving the mixer's current settings.
- Touch the Proceed button to continue the upgrade. The mixer will boot into the Software Upgrader program. This takes a few minutes.
- Select the upgrade file you want to use. If you downloaded to a freshly formatted drive, there will be only one upgrade file displayed.
- Touch the Upgrade button to begin the upgrade process. This can take up to 10 minutes and must not be interrupted.
- When the upgrade is complete, a dialog displays indicating the upgrade was successful. Press the OK button to exit the Software Upgrader and reboot the mixer.
- If you experience problems connecting to tablets and smartphones, put the mixer into Standby disconnect AC power for a few seconds and then reconnect.
Control App
- TouchMix 8 & 16 Android App
- TouchMix 8 & 16 iOS App (New)
- iOS App Update Procedure
- TouchMix 8 & 16 iOS App Release Notes
Firmware
Please read the PC or macOS® installation instructions below prior to downloading firmware
Release Notes for TouchMix-8/16 Control App Version 3.0.34
This update to the TouchMix-8/16 Control App deals with a number of problems caused by changes in iPadOS 17.3 and 17.4 as well as incorporating other improvements and minor bug fixes.
- Fixed improper display of dialog boxes.
- Fixed a bug that caused a “Session already exists” message to be displayed when attempting to create a new session from an iOS device.
- The user will now be informed if they have chosen an illegal prefix (such as CON) for their device name.
- Improved reconnection to mixer after briefly switching away from TouchMix-8/16 app.
- Fixed an issue that caused loss of iOS app control over personal monitor mix under certain conditions.
- Various small bug fixes.
Release Notes for Firmware Version 3.0.09551
New Features / Improvements (Mixer):
- This is a maintenance release only and does not include any significant changes to features or functionality.
Bug Fixes (Mixer)
- Fixed a bug that caused FX to stop working after extended operation.
- Fixed a bug that caused unexpected operation of the stereo delay effect when the Tempo window is selected and the encoder wheel is turned.
- Fixed a bug that caused a stereo meter to appear on a mono aux output when the Anti-Feedback tab is selected.
- Fixed a bug that caused the Ethernet driver to crash (requiring a power cycle to recover) when an invalid value for the Network Setup Gateway is entered.
Bug Fixes (Android)
- Changes in the Android OS and Chrome browser could cause a condition in which meter activity on the Android device would cause the Android app to crash. This has been remedied with this release.
Windows Download and Installation
Revised 06/07/2017
The following instructions apply to a download that is performed using a Windows computer.
- Download the latest firmware from the QSC website.
- Unzip the downloaded file. The extracted contents will be a tar.gz file.
- Prepare a USB thumb-drive, SSD or HD with 1GB of available storage space formatted FAT32. For best results, use a freshly formatted drive.
- Copy the .tar.gz file onto the USB storage device. The file on the storage device will be in the format "V3.0.0000.tar.gz". The version number will vary depending on the release but the file will always end with extension "tar.gz".
- Insert the USB storage device into one of the two USB ports on the mixer's rear panel.
- Press the Menu button, then touch the Mixer Setup button.
- On the Mixer Setup screen, touch the Upgrade button. A dialog box displays with some IMPORTANT information about saving the mixer's current settings.
- Touch the Proceed button to continue the upgrade. The mixer will boot into the Software Upgrader program. This takes a few minutes.
- Select the upgrade file you want to use. If you downloaded to a freshly formatted drive, there will be only one upgrade file displayed.
- Touch the Upgrade button to begin the upgrade process. This can take up to 10 minutes.
- When the upgrade is complete, a dialog displays indicating the upgrade was successful. Press the OK button to exit the Software Upgrader and reboot the mixer.
- If you experience problems connecting to tablets and smartphones, put the mixer into Standby disconnect AC power for a few seconds and then reconnect.
macOS Download and Installation
Revised 06/07/2017
The following instructions apply to a download that is performed using a macOS computer.
Before you download!
The TouchMix updater expects to see a zipped tar.gz folder. Macintosh computers include features that automatically unzip downloaded folders and they seem quite insistent about doing so.
Before downloading the file follow these steps:
- Launch the finder on your Mac and Type "Archive Utility" in the search field.
- To locate the Archive Utility manually – double-click the icon for the drive containing your computer's system, follow the path: System/Library/CoreServices/Applications.
- If you do not have access to your Macintosh HD, click anywhere on your desktop, click the word "Finder" in the upper left hand corner of your desktop and select preferences. In the general tab, under 'Show these items on the desktop:" check the box next to "Hard Disks" and your Macintosh HD will appear on the desktop. You can then follow the path above to access the Archive Utility.
- Double click the Archive Utility icon to Launch the application.
- On the Menu Bar at the top of the screen, click on "Archive Utility" and select "preferences" from the drop down menu.
- On the Archive Utility Preferences window, uncheck "Keep expanding if possible".
- If using Safari- Double click the "Safari" icon to launch the browser.
- On the menu bar at the top of the screen, click on "Safari" and select "Preferences" from the dropdown menu.
- On the Safari Preferences window, uncheck "Open safe files after downloading".
Your macOS computer will now download the upgrade without unzipping it.
- Download the latest firmware from the QSC website.
- Drag the downloaded file onto your desktop
- Unzip the downloaded file by double clicking it. This extracts the tar.gz file from the zipped folder but leaves the tar.gz file itself unzipped. This is what the mixer expects to see.
- Prepare a USB thumb-drive, SSD or HD with 1GB of available storage space formatted FAT32. For best results, use a freshly formatted drive. Performing a FAT32 format using a macOS computer can be a bit tricky. Here's how to do it.
- Connect the drive to your computer and launch the Disc Utility.
- In the Disk Utility left column, select the drive.
- Select Erase.
- Select Format. Then select MS-DOS (FAT).
- Select Scheme. Then select Master Boot Record.
- Click Erase. The utility will now format the drive properly for use with TouchMix. Exit the Disk Utility when you are done.
- Copy the .tar.gz file onto the USB storage device. The file on the storage device will be in the format "V3.0.0000.tar.gz". The version number will vary depending on the release but the file will always end with extension "tar.gz".
- Safely eject the USB storage device from your Mac.
- Insert the USB storage device into one of the two USB ports on the mixer's rear panel.
- Press the Menu button, then touch the Mixer Setup button.
- On the Mixer Setup screen, touch the Upgrade button. A dialog box displays with some IMPORTANT information about saving the mixer's current settings.
- Touch the Proceed button to continue the upgrade. The mixer will boot into the Software Upgrader program. This takes a few minutes.
- Select the upgrade file you want to use. If you downloaded to a freshly formatted drive, there will be only one upgrade file displayed.
- Touch the Upgrade button to begin the upgrade process. This can take up to 10 minutes.
- When the upgrade is complete, a dialog displays indicating the upgrade was successful. Press the OK button to exit the Software Upgrader and reboot the mixer.
- If you experience problems connecting to tablets and smartphones, put the mixer into Standby disconnect AC power for a few seconds and then reconnect.


Sign-up for TouchMix Notifications
You have already submitted this form. Please visit our Subscription Management Page to update your preferences.